How to Choose the Perfect Size & Thickness for Your Enamel Pin Design
The ultimate guide for artists, brands, and first-time creators — with comparison charts, detail-level recommendations, and expert tips from CreatePins
Choosing the right size and metal thickness for your enamel pin is one of the most consequential decisions in the entire design process — and one of the most commonly misunderstood by first-time creators. Size determines how much detail your design can hold, how it looks when worn, and a significant portion of your production cost. Thickness determines the weight, durability, and perceived quality of the finished piece.
This guide gives you the exact numbers manufacturers use, the popularity data from 50,000+ orders, and a clear decision framework to pick the right combination for your specific design and goals.
How Enamel Pin Size Is Measured
When manufacturers refer to pin size, they mean the largest single dimension of the finished design — either width or height, whichever is greater. This single measurement determines mold cost, detail resolution capability, and base pricing.
Vertical pin: 1.25″ tall × 0.8″ wide → described as a 1.25-inch pin
Wide pin: 1.5″ wide × 0.7″ tall → described as a 1.5-inch pin
The shape of your design doesn’t matter — only the longest measurement is used for pricing and ordering.
This single measurement is used across the industry to quote, specify, and produce pins. When you submit your order, always confirm whether you’re specifying the longest dimension or a specific width × height — and ask your manufacturer to confirm the interpretation before production begins. For a full walkthrough of the ordering flow, see our step-by-step guide to ordering enamel pins.
Popular Pin Sizes & Popularity Ratings
Based on data from 50,000+ production orders across artists, brands, conventions, and corporate clients, here’s how pin size choices break down in the real world:
| Size | Best For | Popularity | Detail Capacity |
|---|---|---|---|
| 0.75 inch | Ultra-minimal icons, logo marks, simple symbols | ★★☆☆☆ | Very low — bold, simple shapes only |
| 1.0 inch | Simple icons, clean logos, minimal line art | ★★★★☆ | Low — limited fine detail |
| ⭐ 1.25 inches | Most standard designs — best all-round choice | ★★★★★ | Moderate — works for most character and illustration designs |
| ⭐ 1.5 inches | Highly detailed artwork, characters, collector merch | ★★★★★ | Good — fine lines, subtle shading, small text |
| 1.75 inches | Statement pieces, convention exclusives, bold designs | ★★★☆☆ | High — complex artwork reads clearly |
| 2.0 inches+ | Limited editions, medals, specialty art pins, prestige pieces | ★★☆☆☆ | Very high — maximum detail capacity |
📊 Industry stat: 1.25″ and 1.5″ sizes together account for approximately 70% of all CreatePins orders. If you’re unsure where to start, 1.25″ is the single most versatile and reliable choice for a first production run.
Choosing Size by Detail Level
Your design’s complexity is the most important factor in choosing size. A design that looks great at full screen can lose critical detail when shrunk to pin scale. Use this table as your primary reference:
| Detail Type | Recommended Size | Notes |
|---|---|---|
| Minimal line art — bold shapes, 2–3 colors | 0.75″ – 1.0″ | Works well; avoid fine detail or small internal shapes |
| Moderate detail — most character designs | 1.0″ – 1.25″ | Best balance of clarity and cost for standard designs |
| Standard illustration — faces, multi-color fills, subtle outlines | 1.25″ – 1.5″ | The sweet spot for most independent artists and brands |
| Highly detailed illustration — textures, shading, tiny shapes | 1.5″ – 2.0″ | Essential for complex artwork; thinner lines remain crisp |
| Micro text or complex logo details | 1.5″ – 2.0″ | Text below 6pt needs extra space; always test at final size |
These are the physical limits your die lines must meet — and they get harder to achieve at smaller sizes:
Soft enamel: 0.25 mm minimum line thickness
Hard enamel: 0.30 mm minimum (polishing requires thicker lines)
UV-printed detail: 0.10 mm minimum (most fine-detail capable)
A complex design that works at 1.5″ may have lines too thin to produce at 1.0″. Always check your thinnest lines against these minimums at the actual final pin size. More line-work rules are covered in our Enamel Pin Production Specifications.
🎨 Not sure if your design works at the size you want? Upload your artwork and our team will check line thickness, detail feasibility, and size suitability — free with every quote.
Get a Free Artwork ReviewChoosing Size by Function & Purpose
Beyond design complexity, the intended use of your pin should influence size choice. A corporate lapel pin has different requirements than a collector-grade convention exclusive.
| Purpose | Recommended Size | Why |
|---|---|---|
| Fashion pins — jackets, bags, hats | 1.25″ – 1.75″ | Eye-catching at a distance; holds visual presence on clothing |
| Corporate logo / employee uniform pins | 0.75″ – 1.25″ | Subtle, professional, and cost-effective for bulk production |
| Convention / artist merch | 1.25″ – 1.5″ | Industry standard for artist alleys; familiar to collectors |
| Giveaway / event pins | 1.0″ – 1.25″ | Lower cost per unit for large quantities; still visually effective |
| Collector / limited edition pins | 1.5″ – 2.0″ | Premium presence; commands higher retail price; display-worthy |
| Medal-style / recognition pins | 1.75″ – 2.5″ | Prestige requires presence; large size signals significance |
| Kids’ / novelty pins | 1.0″ – 1.5″ | Bright, readable, and safe; avoid very small sizes for children |
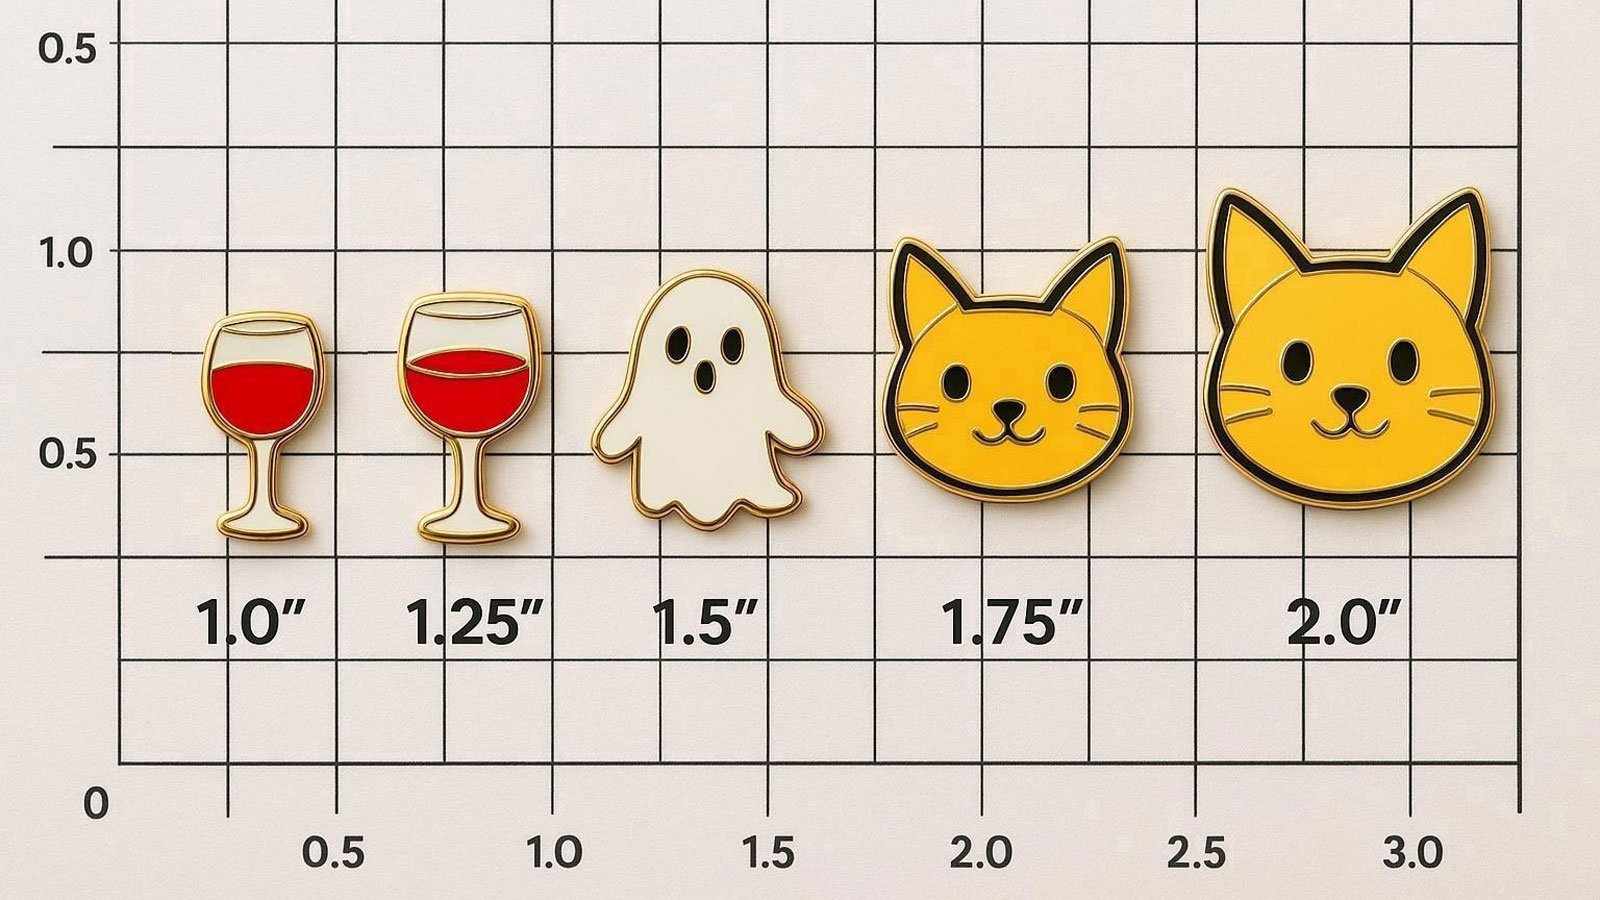
Size Comparison Visual Guide
This visual guide shows the relative scale of common pin sizes — useful for understanding how each will look in practice:
Relative Pin Size Reference (approximate visual scale)
Understanding Metal Thickness
Metal thickness is the depth of the pin’s metal base — measured in millimeters. It directly affects structural strength, weight in hand, perceived quality, and to a lesser extent, cost. Thickness is an invisible specification that buyers never see but always feel.
A pin with excellent design but insufficient thickness can feel flimsy, fail to hold the clutch securely, or flex slightly when handled — all of which undermine the premium impression that a well-crafted enamel pin should create. For a deeper dive, read our full enamel pin thickness guide.
Soft enamel pins: 1.5 mm — the reliable industry standard for all sizes up to 1.5″
Hard enamel pins: 1.6 mm — the extra 0.1 mm makes a perceptible difference in the polished surface quality
Large pins (1.75″ and above): 2.0 mm — structural necessity for pins this size; prevents flexing and supports heavier clutch hardware
Thickness by Pin Type & Size
| Pin Size | Soft Enamel | Hard Enamel | Notes |
|---|---|---|---|
| Under 1.0″ | 1.2–1.5 mm | 1.5 mm | 1.2 mm acceptable for mini pins; 1.5 mm preferred for better feel |
| 1.0″ – 1.5″ | 1.5 mm | 1.6 mm | Industry standard for this range — most orders fall here |
| 1.5″ – 1.75″ | 1.6 mm | 1.6 mm | Step up for larger soft enamel pins to maintain rigidity |
| 1.75″ and above | 2.0 mm | 2.0 mm | 2.0 mm recommended or required for structural integrity at large sizes |
For pins 1.75″ and larger, a single pin post may cause the pin to rotate and droop when worn. Specify a two-post configuration for larger designs — this distributes weight evenly and keeps the pin oriented correctly on clothing. This is particularly important for wide horizontal designs and oversized statement pieces. See our guide to choosing enamel pin backings for more.
Quick Decision Guide by Use Case
Use this summary to find your recommended size and thickness combination quickly based on your specific situation:
📋 Find Your Recommended Spec
The safest, most versatile starting point. Works for 90% of designs and produces a professional, premium-feeling result.
Great detail capacity and visual presence for convention sales, Etsy shops, and online stores.
Subtle, professional, and cost-effective for bulk orders. Hard enamel gives a polished, durable finish.
Lower unit cost at volume; still visually effective and wearable. Soft enamel reduces cost for large quantities.
Premium weight and presence justify higher retail prices. Hard enamel’s polished surface adds luxury feel.
Prestige requires physical presence. Large size signals significance; use two posts for stability.
How Size & Thickness Affect Cost
Understanding the cost drivers helps you make informed size decisions, especially when balancing design ambitions against production budget.
Size & Cost
- Mold (die) cost — increases with pin size and complexity; this is a one-time cost that’s amortized across your order quantity. Larger pins require larger, more complex dies.
- Per-unit material cost — increases with size as more metal and enamel are used per pin. The jump from 1.25″ to 1.5″ is modest; the jump to 2.0″+ is more significant.
- Number of enamel colors — each separate color zone requires an individual fill operation. More colors add cost regardless of size — but are less impactful than overall size.
- Special effects — glitter enamel, glow-in-the-dark, screen printing, and epoxy dome finishing all add cost on top of base size pricing.
Thickness & Cost
- Upgrading from 1.5 mm to 1.6 mm adds a small per-unit cost premium that is almost always worth it for hard enamel pins given the quality improvement.
- Upgrading from 1.6 mm to 2.0 mm has a more meaningful per-unit cost impact but is generally necessary rather than optional for larger pins.
- Do not reduce thickness purely to save cost — a lighter, thinner pin that feels cheap undermines the perceived value and can cost you more in negative customer reactions than the material saving provides.
The most cost-efficient approach for most creators: produce a first run at 1.25″ or 1.5″ with standard thickness. Once you’ve validated the design with customers and have proof of demand, invest in a larger or more premium version for a limited collector run. This stages your risk and lets market demand guide your premium production decisions. For full breakdowns, see how much enamel pins cost to make in 2026 and our pricing guide.
Ready to Turn Your Design into Reality?
Get a free, no-obligation quote from CreatePins — including a free artwork review and expert size and thickness recommendations from our production team.
Get Your Free Quote Now →Free artwork review · Expert recommendations · Response within 24 hours
Frequently Asked Questions
Common questions from first-time creators and designers about enamel pin size and thickness.
The most popular enamel pin sizes are 1.25 inches and 1.5 inches, which together account for approximately 70% of all pin orders. These sizes offer the best balance between design detail, visual presence on clothing and accessories, and production cost. 1.25 inches is ideal for most standard designs, while 1.5 inches gives more room for complex artwork and character details.
Enamel pin size refers to the largest single measurement of the finished design — either width or height, whichever is greater. A vertical pin 1.25 inches tall and 0.8 inches wide is described as a 1.25-inch pin. A wide pin 1.5 inches across and 0.7 inches tall is described as a 1.5-inch pin. This measurement is used by manufacturers to determine mold cost, detail resolution, and pricing.
For soft enamel pins up to 1.5 inches, 1.5 mm is the industry standard. For hard enamel pins, 1.6 mm is recommended because the polishing step benefits from slightly thicker metal. For larger pins (1.75 inches and above), 2.0 mm is required for structural integrity and to deliver the premium weight feel appropriate for statement or collector pieces.
Minimum metal die line thickness varies by enamel type: soft enamel requires a minimum of 0.25 mm; hard enamel requires at least 0.30 mm due to the polishing step; UV-printed details can go as fine as 0.10 mm. Designing at a smaller pin size makes meeting these minimums more challenging — a complex design that works at 1.5 inches may have lines too thin to produce cleanly at 1.0 inch.
Yes — pin size directly affects production cost through larger mold (die) requirements, more metal material per pin, and more enamel fill area. The mold cost is a one-time fee that increases with size and complexity. Per-unit production cost also increases with size. The jump from 1.25 to 1.5 inches is modest and usually worthwhile; the jump to 2.0 inches or larger is more significant and should be reserved for designs that genuinely need the space.
For first-time pin creators, 1.25-inch hard enamel at 1.6 mm thickness is the most reliable starting choice. It works well for 90% of designs, offers a professional weight and feel, and avoids the common problems of designs that are too small (detail loss) or too large (high mold costs). If your design is detailed or features a character with fine lines, 1.5 inches gives additional room for the artwork to breathe cleanly.
References & Further Reading
- Common Enamel Pin Types: Differences, Costs & Mistakes (2026)
- Hard Enamel vs Soft Enamel Pins: The Ultimate Guide (2026)
- Enamel Pin Thickness Explained: How It Affects Quality, Durability, and Cost
- Enamel Pin Production Specifications
- Custom Enamel Pin Production Expectations & Tolerances
- How Much Do Enamel Pins Cost to Make in 2026?
- Pricing Custom Enamel Pins for Profit: Cost Breakdown, Calculator & Pricing Tips
- How to Choose the Right Enamel Pin Backings: Complete Guide, Risks & Pro Tips (2026)
- The 7 Factors That Determine Enamel Pin Quality – Manufacturing Guide
- What Thickness Should Your Keychain Be
- Turning AI Art into Manufacturable Enamel Pins
- 15 Enamel Pin Design Ideas That Always Sell (Proven & Creative)
- How to Store Enamel Pins & Display Tips
- Complete Beginner’s Guide to Designing Custom Challenge Coins
- Want More Than Just Custom Pins?