Glow in the Dark Enamel Pins: Complete Design Guide (2026)
Everything you need to know about designing, ordering, and selling glow-in-the-dark enamel pins — from how the science works to design tricks, color limits, file prep, plating choices, and photography tips.
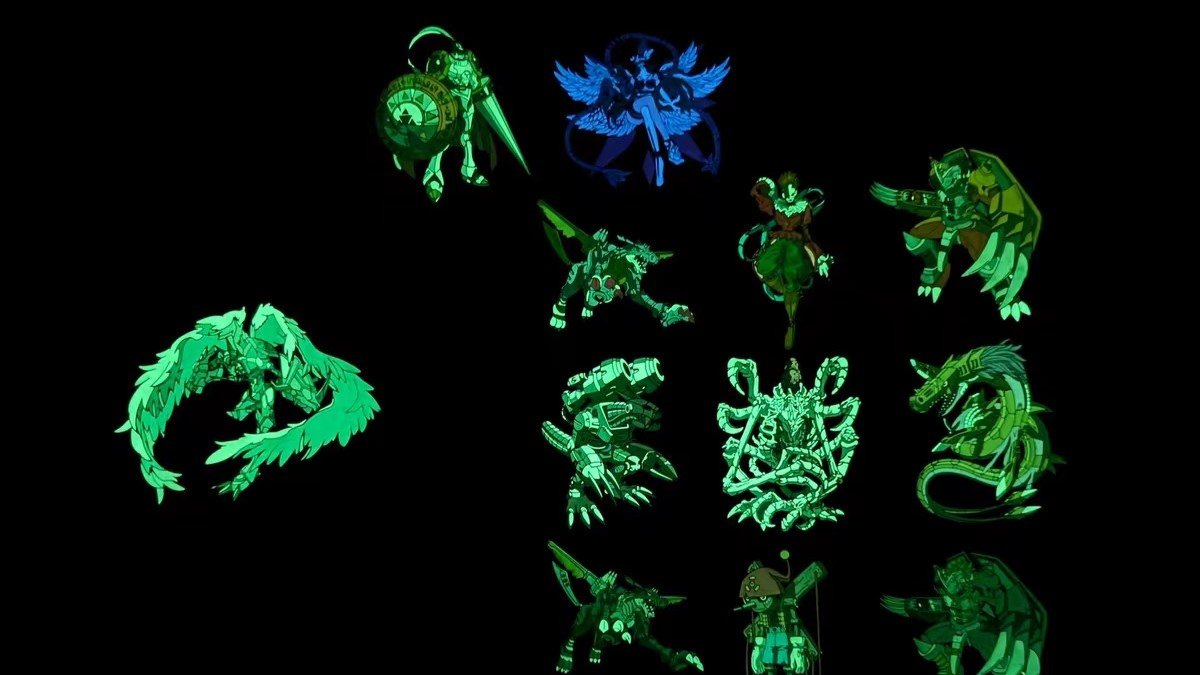
Glow-in-the-dark (GITD) enamel pins are one of the most striking and commercially successful specialty pin products available. They deliver a genuine moment of surprise and delight — a pin that looks one way under the lights and transforms completely in the dark. For artists, brands, and collectors alike, that dual-identity effect creates an emotional connection that standard enamel pins simply cannot match.
But GITD pins come with their own design rules, material constraints, and production decisions that catch beginners off guard. This guide covers every aspect of the process so you can design GITD pins that perform brilliantly in both daylight and darkness, order them with confidence, and sell them with compelling photography and copy.
- How glow-in-the-dark enamel actually works — the science simply explained
- Why GITD only works with soft enamel, not hard enamel
- All available GITD colors with brightness and duration ratings
- How to design effectively for both daylight and dark-mode appearances
- Plating choices that enhance or diminish the glow effect
- File preparation, color specification, and artwork requirements
- Production limits, pricing, and MOQ guidance
- Photography and marketing tips specific to GITD pins
- Common beginner mistakes and exactly how to avoid them
- How Glow-in-the-Dark Enamel Works
- Why GITD Only Works with Soft Enamel
- Available GITD Enamel Colors Compared
- Design Principles: Daylight vs. Dark Mode
- Plating Choices for GITD Pins
- File Preparation & Artwork Requirements
- Production Limits & Design Rules
- Step-by-Step: Ordering Your GITD Pin
- Size & Thickness Recommendations
- Pricing & Minimum Order Quantities
- Photography & Marketing Tips
- Common Beginner Mistakes to Avoid
- Frequently Asked Questions
1. How Glow-in-the-Dark Enamel Works
Understanding the science behind GITD enamel will help you design better, set accurate customer expectations, and avoid disappointment when your sample arrives.
The Phosphorescent Pigment Explained
Glow-in-the-dark enamel uses phosphorescent pigments — most commonly strontium aluminate (SrAl₂O₄), often doped with europium and dysprosium to extend glow duration. These pigments work through a process called photoluminescence:
- Charging (absorption): When exposed to any light source — sunlight, UV light, or indoor artificial lighting — the phosphorescent crystals absorb photon energy and store it in their molecular structure.
- Glowing (emission): When the light source is removed, the crystals slowly release the stored energy as visible light — the characteristic glow you see in darkness.
- Recharging: The cycle repeats indefinitely. The glow effect is permanent and never "wears out" — the pigments simply absorb and emit light every time the cycle occurs.
Glow Duration and Brightness — What to Realistically Expect
| Time After Charging | Glow Brightness | Visible In… |
|---|---|---|
| 0–2 minutes | Very bright | Dim room or full darkness |
| 2–15 minutes | Bright | Full darkness |
| 15–60 minutes | Moderate | Full darkness only |
| 1–4 hours | Faint to very faint | Only in very dark rooms with adjusted eyes |
| 4+ hours | Negligible | Not visible to most people |
Strontium Aluminate vs. Zinc Sulfide — Why It Matters
| Pigment Type | Glow Brightness | Glow Duration | Safety | Cost |
|---|---|---|---|---|
| Strontium Aluminate | 10× brighter | 4–8 hours | Non-toxic ✓ | Higher |
| Zinc Sulfide | Dim | 30–60 minutes | Non-toxic ✓ | Lower |
Always confirm with your manufacturer that they use strontium aluminate pigments. Zinc sulfide is an older, significantly inferior formulation still used by some budget factories. The difference is immediately obvious — strontium aluminate glows intensely; zinc sulfide barely registers except in complete darkness. If a supplier cannot confirm which type they use, treat it as a red flag.
2. Why GITD Only Works with Soft Enamel
This is the most important technical fact about GITD pins — and one that catches many designers by surprise.
Glow-in-the-dark enamel is exclusively compatible with soft enamel. It cannot be used with hard enamel.
Here is why: Hard enamel is fired at temperatures between 800–900°C (1,470–1,650°F). At these temperatures, the phosphorescent compounds in GITD pigments are thermally destroyed — the crystal structure that enables photoluminescence breaks down completely. The enamel will fill and polish correctly, but there will be zero glow effect.
Soft enamel is processed at significantly lower temperatures, preserving the phosphorescent crystal structure so the GITD effect survives into the finished product.
Soft enamel gives pins a distinct textured, dimensional feel — the enamel sits recessed below the raised metal lines. Many collectors specifically love this aesthetic. But if your concept requires a smooth glass-flat surface, be aware that GITD requires you to work with the soft enamel texture. For a full comparison of soft vs. hard enamel, see our complete enamel pin design guide.
3. Available GITD Enamel Colors Compared
Not all GITD enamel colors are created equal. Brightness and glow duration varies significantly by color — this is a fundamental property of how phosphorescent pigments interact with different colorant compounds. Below is a practical overview of every color available and how they perform.
Green
Glow rating: ⭐⭐⭐⭐⭐
Brightest and longest-lasting. The purest strontium aluminate output. Visible glow for 4–6+ hours after full charge. The gold standard of GITD enamel. Daylight appearance: white / pale green.
Aqua / Blue-Green
Glow rating: ⭐⭐⭐⭐⭐
Nearly as bright as green. Very popular for ocean, space, and fantasy themes. Glow visible 3–5 hours. Daylight appearance: pale cyan / white.
Blue
Glow rating: ⭐⭐⭐⭐
Good brightness, slightly shorter duration than green. Popular for night sky, water, and sci-fi designs. Glow visible 2–4 hours. Daylight appearance: light blue / white.
Yellow-Green
Glow rating: ⭐⭐⭐⭐
Warm glow tone. Good intensity. Popular for nature, slime, and retro themes. Glow visible 2–4 hours. Daylight appearance: pale yellow / cream.
Teal
Glow rating: ⭐⭐⭐⭐
Cool blue-green with good duration. Popular for mermaid, underwater, and botanical themes. Glow visible 2–4 hours. Daylight appearance: pale mint / white-green.
White
Glow rating: ⭐⭐⭐
Soft, ghostly glow — very popular for Halloween and horror designs. Shorter duration (1–3 hours). Daylight appearance: bright white (blends into background).
Purple / Pink
Glow rating: ⭐⭐
Dimmer than green/blue. Short glow duration (30–90 minutes). Best used as an accent alongside brighter GITD colors. Daylight appearance: pale lavender / pink.
Red / Orange
Glow rating: ⭐
Weakest GITD performance. Very dim, very short duration (under 30 minutes). Not recommended as a primary GITD color. Use regular red/orange enamel for warm tones and add green/aqua GITD accents separately. Daylight appearance: pale peach / salmon.
4. Design Principles: Daylight vs. Dark Mode
The biggest conceptual shift when designing GITD pins is accepting that your pin has two completely different appearances — one under light, one in darkness. Great GITD pin designs are intentionally crafted to look excellent in both states.
| State | What the Customer Sees | Your Design Goal |
|---|---|---|
| Daylight / Normal Light | Regular enamel colors + pale/white GITD areas | GITD areas read as natural light-colored design elements (stars, moons, bones, eyes) |
| Darkness / Glow Mode | Vivid GITD glow + dark/black regular enamel areas | Glow areas create a coherent, recognizable, or surprising secondary image |
Four Design Strategies That Work
Strategy 1: Accent Glow (Most Common & Beginner-Friendly)
Use GITD enamel for specific accent elements within a fully designed pin. The regular enamel carries the main visual weight in daylight; the GITD areas add a magical bonus at night. Examples: stars in a night sky, a glowing moon, eyes on a cat or skull, lightning bolts, magical auras around a character, bioluminescent spots on a creature. This is the safest approach for a first GITD pin — easy to design, easy to approve on sample, and reliably impressive.
Strategy 2: Hidden Image Reveal (Most Dramatic)
Design the pin to show one image in daylight and a completely different image in darkness. The GITD areas appear as subtle pale shapes in daylight; in darkness they illuminate to reveal a hidden second image — a skeleton beneath a clothed figure, a constellation appearing over a landscape, a secret message revealing itself. This approach drives the most social media sharing and creates a genuine "wow" moment, but requires the most careful design planning.
Strategy 3: Full Glow Design
Use GITD enamel as the primary fill across most of the pin's surface. In daylight the pin looks white and ghostly — which can be a feature for Halloween, horror, or alien themes. In darkness it glows intensely across the whole surface. Best for ghost, skeleton, alien, spirit, and monster designs where the pale daylight look fits the theme.
Strategy 4: Constellation / Star Map
Design a dark-colored base (deep blue, black, or navy regular enamel) with GITD dots and lines as stars and constellation connections. In daylight the dots are subtle pale cream points on a dark background. In darkness they glow like a real star map. One of the most universally appealing GITD concepts with broad gift market reach.
Design Elements That Suit GITD Perfectly
- Stars, moons, and planets — the pale daylight tone matches stellar objects naturally
- Eyes and pupils — glowing eyes are one of the most universally striking GITD effects
- Skeletons and bones — GITD white/cream is perfect for bone colors in daylight; iconic glow at night
- Lightning bolts, magic auras, energy beams — suggest power and energy in both states
- Bioluminescent creatures — jellyfish, deep-sea fish, mushrooms, fireflies, anglerfish lures
- Ghosts and spirits — the pale daylight appearance is thematically fitting
- Alien and sci-fi elements — reactor cores, alien eyes, glowing tech details
- Floral highlights — subtle GITD accents on petal edges create a fairy-tale effect
- Secret messages — text or symbols only visible in darkness create a collector's exclusive reveal
5. Plating Choices for GITD Pins
The plating choice has a direct impact on how impressive your GITD pin looks — particularly in darkness. The metal surrounding your GITD enamel areas acts as a visual backdrop, and its color and reflectivity affects the perceived intensity of the glow. For a complete overview of all plating options and their properties, see our beginner's guide to enamel pin plating colors.
| Plating | GITD Performance | Daylight Look | Best Themes |
|---|---|---|---|
| Silver | Excellent | Clean, modern, neutral | Space, celestial, sci-fi, minimal |
| Black Nickel | Excellent | Dark, dramatic, premium | Horror, Halloween, gothic, skull, alien |
| Gold | Good | Warm, classic, inviting | Fantasy, floral, nature, magical |
| Rose Gold | Good | Soft, feminine, warm | Pastel fantasy, fairy, mermaid |
| Antique Gold | Moderate | Aged, rustic, vintage | Occult, vintage, navigation/map |
| Antique Silver | Moderate | Worn, industrial, old | Steampunk, gothic, archaeological |
| Copper | Moderate | Warm orange-brown | Earthy, botanical, witchcraft |
6. File Preparation & Artwork Requirements
Preparing files for GITD pins follows the same fundamental rules as any custom enamel pin, with a few critical additions specific to GITD areas. For comprehensive detail on file types and export settings, see our guide to best file formats for custom enamel pins.
Preferred File Formats
- Adobe Illustrator (.AI): Best choice. Fully editable vectors, all layers clearly labeled, text converted to outlines.
- EPS: Equally good vector format. Universally accepted by all manufacturers.
- High-resolution PNG or PSD: Acceptable if you have no vector source. Minimum 300 DPI at actual production size. The factory will re-trace as vectors.
Labeling GITD Areas — The Critical Step
Every GITD color area must be clearly and unambiguously labeled in your artwork file. Do not assume the factory will guess which areas should glow. Factories handle hundreds of orders simultaneously — anything ambiguous defaults to standard enamel, and you will receive a pin with no glow at all.
- Create a separate layer named "GITD AREAS" with all glow elements highlighted in a distinctive spot color (bright magenta works well)
- Annotate each GITD zone directly on the file: "GITD GREEN" or "GITD AQUA"
- Include a written color spec sheet listing every color and explicitly stating which are GITD and which are standard enamel
- Provide both a daylight mockup and a dark-mode mockup so the factory can confirm they understand your intent
Color Specification for GITD Areas
Regular enamel colors are matched to Pantone Solid Coated (PMS) codes. GITD enamel is different — the factory selects from their available GITD pigment stock rather than matching a Pantone exactly. This means:
- Specify GITD by color name (green, aqua, blue, white) — not a Pantone code
- Ask your manufacturer to send their GITD color sample card before finalizing the design
- For regular enamel areas in the same design, still specify Pantone PMS codes as normal
- Account for the fact that GITD colors appear significantly lighter and more white-toned in daylight than their stated glow color
For broader color palette guidance, our complete enamel pin color palette guide covers how to build harmonious palettes that look great in both daylight and darkness.
File Submission Checklist for GITD Pins
- ✅ All text converted to outlines/paths
- ✅ GITD areas on a clearly labeled separate layer
- ✅ Each GITD color zone annotated with color name on the file
- ✅ Written color spec sheet included (listing all colors, marking which are GITD)
- ✅ All regular enamel colors labeled with Pantone PMS codes
- ✅ Metal dam lines minimum 0.6 mm between all adjacent color areas
- ✅ No GITD fill area smaller than 3 mm × 3 mm
- ✅ Daylight mockup and dark-mode mockup both provided
- ✅ File saved at actual production size or larger
- ✅ Pin backing hardware position (clutch post) indicated
7. Production Limits & Design Rules
GITD pins share most production constraints with standard soft enamel pins, plus a few additional considerations specific to the phosphorescent fill process. Getting these right at the design stage prevents costly revision rounds or disappointing samples.
Minimum Metal Line Width
- Outer border/outline: minimum 0.8 mm — ideally 1.0 mm for keychains
- Internal color dividers: minimum 0.6 mm
- Lines surrounding GITD areas: minimum 0.6 mm — thicker lines better contain the GITD fill and prevent bleed into adjacent colors
For detailed line width guidance based on overall pin size, see our expert enamel pin size and thickness guide.
Minimum GITD Fill Area Size
Very small GITD areas may not fill consistently or produce a visible glow. The phosphorescent pigment particles are slightly coarser than standard enamel pigments, making them harder to fill into tiny spaces.
- Minimum GITD fill area: 3 mm × 3 mm
- Minimum GITD stripe/line width: 2 mm
- GITD dots under 2 mm diameter: avoid entirely — they will not fill consistently
Preventing Color Bleed Between GITD and Standard Enamel
During the enamel-filling process, GITD and standard enamel colors must never share a border without a raised metal dam between them. Colors that bleed together during baking produce muddy edges and reduce glow visibility at borders.
Avoiding Ultra-Fine GITD Details
Fine text, hairline patterns, or intricate tiny shapes in GITD enamel are high-risk. For GITD areas specifically, keep details bolder and simpler than you might for standard enamel. If you need fine detail in your design, put it in the standard enamel areas and use GITD for the broader shapes and accents.
Epoxy Top Coat Considerations
Some manufacturers offer a clear epoxy top coat over soft enamel to give it a smoother, more protected surface. For GITD areas:
- Clear epoxy is compatible and recommended — it does not diminish the glow, protects the enamel surface, and improves the overall look
- Tinted or colored epoxy must be avoided over GITD areas — any pigment in the epoxy will filter the phosphorescent light and significantly reduce visible glow intensity
Our technical tips for enamel pin design covers additional production rules that apply equally to GITD pins.
8. Step-by-Step: Ordering Your GITD Pin
Design in Both States
Create your artwork so it works in daylight (GITD areas = pale cream/white) and in darkness (GITD areas = bright glow). Build both a daylight mockup and a dark-mode mockup. If both look intentional and attractive, proceed. If either state looks confusing or incomplete, revise before ordering.
Request a GITD Color Sample Card
Before finalising which GITD colors to use, ask your prospective manufacturer for a physical sample card showing their available GITD enamel options. View the samples in both daylight and full darkness. The difference in GITD quality between suppliers is significant — always verify before committing to an order.
Prepare Your Artwork File
Prepare your AI or EPS file with GITD areas on a clearly labeled separate layer. Annotate every GITD color zone. Write a spec sheet listing all colors and marking which are GITD. Verify all metal dam lines are at least 0.6 mm and no GITD fill area is smaller than 3 mm × 3 mm. Review all technical design rules before submitting.
Request Quotes from 2–3 Manufacturers
Send your artwork, spec sheet, and mockups to 2–3 suppliers. Ask each one: "Do you use strontium aluminate GITD pigments?" and "Can you show me samples of previous GITD pins you have produced?" Evaluate communication quality and portfolio evidence of GITD experience, not just price. See our guide on ethical enamel pin manufacturing for a full supplier evaluation checklist.
Review the Digital Proof Carefully
Your chosen manufacturer will send a digital proof. Verify: all color areas correctly identified, GITD zones match your spec, metal dam lines clearly present, plating color correct. Request both a daylight render and a simulated dark-mode render if possible. Do not approve anything you are not fully satisfied with — revisions after approval are expensive or impossible.
Order a Physical Sample — Non-Negotiable for GITD
For GITD pins, a physical sample is absolutely essential. You cannot evaluate glow brightness, glow duration, or daylight color accuracy from a digital render. Test the sample in both bright sunlight and in a completely dark room. Compare the glow to your expectations. Test the UV charging response. If anything falls short, request changes before approving full production. Sample cost is typically $20–$60 and is money extremely well spent.
Approve and Place Production Order
Once the sample meets your standard, approve production, confirm quantity and packaging, and pay your deposit (typically 30–50%). Confirm your production timeline, expected ship date, and tracking arrangement in writing before paying.
Photograph in Both States and Launch
When your order arrives, photograph your pins in both daylight and darkness before listing them for sale. The dark-mode glow photographs are your most powerful marketing asset — use them prominently in your shop, on social media, and in advertising. See the photography section below for setup tips.
9. Size & Thickness Recommendations
Size affects how impressive the GITD effect appears. Small pins with small GITD areas produce a subtle, easy-to-miss glow. Larger pins with larger GITD surface area produce a much more dramatic and satisfying effect. For GITD pins, we generally recommend sizing up from your standard pin equivalent.
| Pin Size | GITD Effect Quality | Best GITD Design Approach | Recommended For |
|---|---|---|---|
| 25–35 mm | Subtle | Simple accent (single star, eye, small moon) | Add-on to existing pin line |
| 40–50 mm | Good — satisfying glow | Multiple accents or medium GITD shapes | Main GITD product for most brands |
| 55–65 mm | Impressive — large glow area | Hidden image reveal, full constellation maps | Statement pieces, collector editions |
| 70 mm+ | Spectacular | Full scene reveal, large character glow | Limited-edition premium releases |
10. Pricing & Minimum Order Quantities
Minimum Order Quantities
GITD pins do not typically carry a higher MOQ than standard soft enamel pins. Most manufacturers require 50–100 pieces minimum per design. For established designs with proven demand, ordering 200–500 pieces reduces your per-unit cost significantly.
GITD Price Premium
Expect a per-unit premium of approximately $0.30–$0.80 per pin for GITD enamel compared to standard enamel, depending on the number of GITD color areas. This is a relatively small premium — and given that GITD pins consistently command $2–$5 higher retail prices than standard pins, the margin improvement is very attractive.
| Quantity | Standard Soft Enamel | GITD Soft Enamel (est.) | Suggested Retail |
|---|---|---|---|
| 50 units | $2.00 – $3.50 | $2.50 – $4.20 | $12 – $18 |
| 100 units | $1.30 – $2.20 | $1.70 – $2.90 | $12 – $18 |
| 200 units | $1.00 – $1.70 | $1.35 – $2.30 | $12 – $18 |
| 500 units | $0.70 – $1.20 | $1.00 – $1.70 | $12 – $18 |
Key Factors That Affect Your GITD Pin Price
- Number of GITD color areas: each additional GITD color may add $0.10–$0.20 per unit
- Total color count (GITD + standard combined): more colors increase cost
- Pin size: larger pins use more material
- Plating choice: black nickel and rose gold typically cost slightly more than standard gold or silver
- Packaging: custom backing cards add $0.10–$0.30; velvet pouches $0.40–$0.80
- Quantity: the single biggest cost driver — doubling your order typically cuts per-unit cost by 25–40%
11. Photography & Marketing Tips for GITD Pins
GITD pins have a built-in marketing advantage — the glow photograph is inherently scroll-stopping. A great dark-mode image of your pin glowing against black velvet is almost impossible to ignore in a social media feed. Here is how to capture and use it effectively.
Dark-Mode Photography Setup
- Background: Black velvet absorbs the green/blue glow beautifully without reflection. Dark grey or navy surfaces also work. Avoid white, light wood, or patterned backgrounds for glow shots.
- Charge with UV first: Use a UV torch (365 nm wavelength preferred) for 30–60 seconds directly before shooting. This gives maximum initial brightness.
- Shoot in complete darkness: Any ambient light washes out the glow in your photo. Use a blacked-out room, shoot at night, or construct a dark box around your setup.
- Use a tripod: Long exposures are necessary to capture glow — typically 2–8 seconds at ISO 400–800 and f/2.8–4.0. Without a tripod you will get motion blur that ruins the image.
- Act fast: You have about 60–90 seconds of peak glow after UV charging. Have your camera set up and ready before you charge the pin.
- Capture the charge-up moment: Video of a UV torch being shone on the pin followed by the dramatic glow reveal performs exceptionally well on Instagram Reels and TikTok.
Daylight Photography
Daylight photos are equally important — this is usually the first image customers see in your shop thumbnail. Shoot on a clean neutral background to let the regular enamel colors stand out. Do not hide or underrepresent the pale GITD areas — customers need an accurate preview of the daylight appearance so they are not surprised and disappointed.
Marketing Copy That Converts
- Always mention how it charges: "charges in sunlight, indoor light, or UV — ready to glow in seconds"
- State glow duration honestly: "glows visibly for 2–4 hours after a full charge"
- Mentioning strontium aluminate signals quality to informed collectors
- Side-by-side daylight vs. darkness comparison images are extremely effective in product listings — include at least one
- Short video clips of the glow dramatically outperform still images on TikTok and Instagram Reels
- If you have a UV torch available, show the charging and instant glow in the same video — it demonstrates the product's magic in 5 seconds
Once your pins arrive, for display and selling ideas see our guide on best ways to display enamel pins — a dark-themed display board at events lets GITD pins glow in real time and sells the effect without any words needed.
To stay ahead of what designs and themes are selling well, our pin collecting trends 2026 guide covers the themes and styles generating the most demand right now — useful for planning your next GITD release.
12. Common Beginner Mistakes to Avoid
Fix: GITD is not compatible with hard enamel — the high firing temperatures destroy the phosphorescent compounds. Always specify soft enamel for any design with GITD elements. If you want a smoother surface feel, request a clear epoxy top coat over the soft enamel.
Fix: Always put GITD areas on a clearly named separate layer and annotate them directly on the file. Factories handle hundreds of orders — anything ambiguous defaults to standard enamel. You will receive a pin with no glow at all and will need to reorder.
Fix: Always create a daylight mockup (GITD areas shown as pale cream/white) and evaluate it critically. If the daylight version looks washed-out, random, or confusing, redesign before ordering. Your pin must look intentional and attractive in both states.
Fix: These colors have very poor glow performance. Use green, aqua, blue, teal, or yellow-green as your primary GITD colors. If your theme calls for warm tones, use them in regular enamel and add green or aqua GITD accents separately.
Fix: For GITD pins, a physical sample is non-negotiable. Glow brightness, glow duration, and daylight color accuracy cannot be evaluated from a digital render. Always order and physically test a sample before approving full production. The $20–$60 sample cost is a small price for quality assurance.
Fix: Ask every prospective manufacturer directly: "Do you use strontium aluminate GITD pigments?" Budget suppliers may use zinc sulfide — which glows 10× dimmer and fades within an hour. If they cannot confirm clearly, look elsewhere.
Fix: Keep GITD fill areas at least 3 mm × 3 mm and avoid hairline GITD details or tiny text. The phosphorescent pigment particles are coarser than standard enamel and fill inconsistently in very small or narrow spaces. Keep GITD shapes bold and clear.
Fix: A GITD pin listed with only daylight photos is hiding its biggest selling point. Always include at least one dark-mode glow photograph and ideally a side-by-side comparison. The glow photo drives the purchasing decision for the vast majority of GITD pin buyers.
Ready to Create Your Glow-in-the-Dark Enamel Pins?
Get a fast, detailed quote for your GITD pin project — expert guidance on colors, sizing, and production included, with no commitment required.
Get My Free Quote →Conclusion
Glow-in-the-dark enamel pins are one of the most exciting and commercially rewarding products in the custom pin space. When designed well — with clear intention for both the daylight and dark-mode appearances — they create a product that genuinely surprises and delights customers, drives organic social sharing, and commands premium retail pricing with strong margins.
The keys to success are straightforward: use soft enamel, confirm strontium aluminate pigments, design thoughtfully for both states, label your GITD areas with absolute clarity, always sample physically, and photograph the glow brilliantly. Follow this guide and you will have everything you need to produce GITD pins that stand out in any market.
Complete Enamel Pin Design Guide (2026) · Beginner's Guide to Enamel Pin Plating Colors · How to Choose Enamel Pin Colors · Technical Tips for Enamel Pin Design · Pearl Swirl Enamel Pin Design Guide · Pin Collecting Trends 2026
Frequently Asked Questions
Glow-in-the-dark (GITD) enamel is a soft enamel fill containing phosphorescent pigments — typically strontium aluminate. When exposed to light, the pigments absorb and store energy, then release it as a visible glow in the dark. The GITD effect is only compatible with soft enamel, not hard enamel.
No. GITD pigments require the lower-temperature soft enamel process. Hard enamel is fired at temperatures that destroy the phosphorescent compounds, eliminating any glow effect. If you want GITD on your pin, you must use soft enamel throughout the design.
After a full charge (10–15 minutes of bright light, or 30–60 seconds of UV blacklight), quality strontium aluminate GITD enamel glows visibly for 2–6 hours. The glow is brightest in the first 15–30 minutes, then gradually fades. The pigments recharge every time they are exposed to light — the effect never wears out.
The brightest and longest-lasting GITD colors are green, aqua/blue-green, and blue. Yellow-green and teal also perform well. White produces a softer, ghostly glow. Purple, pink, red, and orange have very poor glow performance and are not recommended as primary GITD colors.
This is an unavoidable property of all phosphorescent pigments — the compounds are naturally pale white or off-white when not glowing. Your GITD areas will appear as pale, muted tones in daylight rather than the vivid glow color. Design around this by treating GITD areas as intentional light-colored elements (stars, bones, moons) that read clearly in daylight and transform dramatically in darkness.
Yes — this is the recommended approach. GITD enamel works best as an accent alongside regular opaque enamel colors. Regular colors provide vivid visual interest in daylight while GITD areas provide the surprise glow effect in darkness. Every color area must be separated from adjacent areas by a raised metal dam line of at least 0.6 mm.
Silver and black nickel are the top choices. Silver provides a clean, neutral look that complements GITD beautifully. Black nickel is spectacular for dark-themed designs — in darkness the black metal disappears completely, leaving only the glowing enamel visible as if floating. Gold and rose gold also work well for fantasy and nature themes. See our plating colors guide for a full comparison.
Yes. Modern GITD enamel pins use strontium aluminate phosphorescent pigments, which are completely non-toxic and non-radioactive. They are safe for adults and children. Always confirm your manufacturer uses strontium aluminate rather than the older zinc sulfide formulations, which are also non-toxic but produce a much dimmer and shorter-lasting glow.
Most manufacturers require a minimum of 50–100 pieces for custom GITD enamel pins — the same as standard soft enamel pins. GITD carries a small per-unit premium of $0.30–$0.80 depending on the number of GITD color areas, but retail prices for GITD pins are typically $2–$5 higher than standard pins, making the margin very attractive.
Use a black velvet background, charge the pin with a UV torch (365 nm) for 30–60 seconds immediately before shooting, then photograph in complete darkness. Mount your camera on a tripod and shoot with 2–8 second exposures at ISO 400–800. Act within 60–90 seconds of UV charging for peak brightness. Always include both a dark-mode glow photo and a daylight photo in your product listing — side-by-side comparisons are extremely effective at driving sales.
Selling fan art merchandise commercially is a legal gray area regardless of finish type. You do not own the intellectual property of characters from existing franchises, so selling without a license from the rights holder carries legal risk. Original art inspired by a fandom but not directly reproducing copyrighted characters is generally safer. Our guide on how to turn fan art into custom pins legally explains your options in detail. Always consult a legal professional if you are unsure.
Related Guides
- Complete Enamel Pin Design Guide (2026) — the full foundation for any custom pin project
- The Beginner's Guide to Enamel Pin Plating Colors — choose the right metal finish for your GITD design
- How to Choose Enamel Pin Colors: A Complete Color Palette Guide — build palettes that work alongside GITD enamel
- Technical Tips for Enamel Pin Design (Beginner Guide) — avoid the most common production mistakes
- How to Choose the Perfect Size & Thickness for Your Enamel Pin — size your GITD design for maximum impact
- Best File Formats for Custom Enamel Pins (AI vs PSD vs PNG) — prepare your artwork correctly
- How to Make Your Own Custom Enamel Pin Mockup — create daylight and dark-mode mockups
- Pearl Swirl Enamel Pin Design Guide: Limits, Risks & Pro Tips — another specialty enamel technique explained
- How to Fix Enamel Pin Damage at Home — care and repair guide for your GITD pins
- Pin Collecting Trends 2026: What's Hot Right Now — see where GITD fits in the current market
- Ethical Enamel Pins Manufacturing: What It Really Means — choose a manufacturer you can trust
- How to Turn Fan Art into Custom Pins (Legally) — important reading before designing inspired artwork
- Best Ways to Display Enamel Pins — show off your GITD pins dramatically at events and markets
- Want More Than Just Custom Pins? — Discover Raoin.com — your one-stop partner for custom products like tote bags, lanyards, patches, and more.