How to Make Your Own Custom Enamel Pin Mockup
A complete beginner-to-intermediate guide to creating realistic, production-ready enamel pin mockups — without needing to be a professional designer
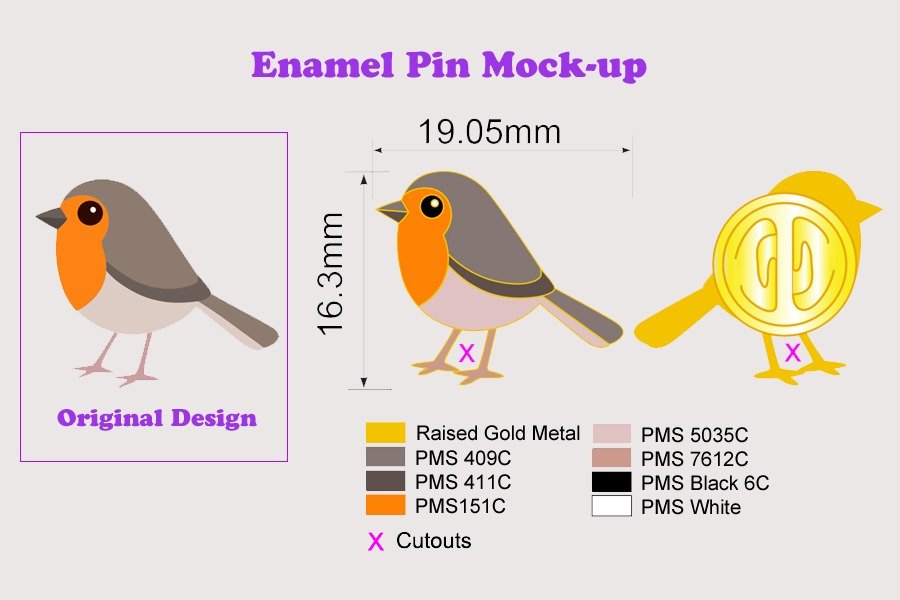
Creating a custom enamel pin mockup is one of the most important steps in the entire production process — and one of the most overlooked by first-time pin designers. A well-crafted mockup helps you visualize the finished product, catch potential issues before manufacturing, and present your idea professionally to customers, backers, or your manufacturer.
Whether you’re preparing for a Kickstarter campaign, pitching a design to an influencer collaboration partner, or simply communicating your vision to a production team, a realistic mockup is your most valuable pre-production asset. The good news? You don’t need to be a professional designer to create one. This guide walks you through every step of the process.
Why Enamel Pin Mockups Matter
Before jumping into the how, it’s worth understanding the why. Many first-time pin creators skip the mockup stage entirely — and it almost always costs them time and money later.
💡 A good mockup is the difference between a pin design that sells confidently and one that arrives from production looking nothing like what you imagined.
Here’s what a proper mockup helps you accomplish:
- Visualize the final product before investing in production runs — see exactly how colors, metal lines, and size interact at scale
- Catch design issues early — thin lines that won’t survive manufacturing, colors that clash, or text that’s too small to read become obvious in a mockup
- Communicate clearly with manufacturers — a mockup removes guesswork and gives your production team a precise visual reference
- Showcase your design professionally — for pre-orders, crowdfunding, influencer partnerships, or retail pitches, a mockup is far more compelling than a flat vector file
- Build confidence in your customers — buyers are far more likely to purchase a product they can visually understand and connect with before it exists
- Speed up manufacturer approval — manufacturers like CreatePins can provide faster, more accurate quotes and approvals from a quality mockup
Think of your mockup as a prototype — it’s the version you test, refine, and validate before committing to production costs.
Step 1: Start with Your Enamel Pin Design
Before you can create a mockup, you need a clean, production-appropriate design file. The quality of your underlying artwork determines the quality of everything that follows.
Recommended File Formats
| Format | Type | Best For | Notes |
|---|---|---|---|
| .AI (Adobe Illustrator) | Vector | Professional pin design — industry standard | Infinitely scalable; preferred by most manufacturers |
| .SVG | Vector | Open-source / free tool workflow | Excellent for Inkscape and browser-based tools |
| .EPS | Vector | Legacy compatibility; print workflows | Widely supported; good for sharing with manufacturers |
| .PNG (high-res) | Raster | Mockup placement, quick presentations | Must be 300 DPI minimum; transparent background required |
Essential Design Rules for Eaneml Pin Artwork
- Use bold, thick lines — metal die lines must be at least 0.4mm at finished pin size; thin lines break during production or fail to hold enamel fill
- Limit your color palette — each color is a separate fill operation in production; 4–6 solid Pantone colors is ideal for beginners
- No gradients in enamel areas — standard enamel filling is flat and opaque; gradients require screen-printing or printing processes at additional cost
- Separate colors clearly — each color zone must be fully enclosed by metal lines with no gaps that would allow enamel to bleed
- Design at actual size — create your artwork at the intended finished dimensions (commonly 1″, 1.25″, 1.5″, or 2″) to catch readability issues early
If you’re creating your design from scratch, Adobe Illustrator is the professional standard. Free alternatives include Inkscape (free vector editor), Canva (beginner-friendly, limited vector support), and Figma (excellent for flat illustration work).
Step 2: Choose a Mockup Method
There are three main approaches to creating an enamel pin mockup, each with its own trade-offs in realism, effort, and skill required. Choose the one that best matches your current tools and timeline.
Photoshop PSD Templates
Use Smart Object layers in a pre-built PSD mockup file. Lighting, shadows, and surface textures are applied automatically when you drop in your artwork.
Online Mockup Generators
Platforms like Placeit, Smartmockups, and Canva let you drag and drop your artwork into pre-made pin mockup scenes with no software needed.
Manual from Scratch
Build your mockup entirely in Illustrator, Photoshop, or Procreate — drawing every element including metal sheen, shadows, and backing hardware yourself.
For most beginners, start with an online mockup generator to get a usable visual quickly. Once you’re more comfortable with your design and have validated the concept, invest time in a Photoshop PSD workflow for production-quality mockups to share with manufacturers and customers.
Step 3: Simulate Metal and Enamel Effects
The key challenge in enamel pin mockup creation is making a flat digital illustration look like a real physical object with specific material properties — polished or brushed metal, recessed or flat enamel fill, and dimensional lighting. Here’s how to approach each element:
Metal Lines (Die Lines / Outlines)
The metal lines are the structural skeleton of every enamel pin. In a mockup, simulate them by:
- Applying a gold, silver, black nickel, antique gold, or rose gold color to all outlines depending on your intended plating
- Adding a subtle bevel and emboss layer effect in Photoshop to create the illusion of raised metal edges
- Using a slight gradient within the metal color (lighter highlight on one edge, darker shadow on the opposite) to mimic the way light catches real metal
- Adding a very faint specular highlight as a thin bright line along the top edge of key metal lines
Enamel Fill
Enamel coloring in a mockup should reflect how real enamel looks in production:
- Use flat, solid Pantone-matched colors — no gradients, no transparency in standard enamel areas
- For soft enamel: add a subtle inner shadow inside each color area to simulate the recessed feel of enamel sitting below raised metal lines
- For hard enamel: keep the surface completely flat and add a reflective sheen across the entire pin face to mimic the polished, glass-like surface
- For glitter enamel: apply a noise or sparkle texture overlay at low opacity within the affected color zones
Shadows, Highlights & Depth
- Add a drop shadow beneath the entire pin to ground it on the background surface
- Apply a gentle overall gradient overlay to simulate directional lighting from above
- Include rim lighting — a faint glow along the edge opposite the light source — for a more polished, dimensional look
Step 4: Add Realistic Details
The difference between a mediocre mockup and a convincing one often comes down to the small details that signal to the viewer’s brain: “this is a real, manufactured object.”
Pin Hardware
- Pin post and clutch — show the back of the pin in a secondary view to help manufacturers and customers understand the full product
- Common clutch types: butterfly (standard), rubber/silicone (premium feel), locking (security clutch for valuable collectors’ items), and magnetic (for fabrics that shouldn’t be punctured)
- Include the clutch type in your mockup if you’re presenting to a manufacturer — it affects production cost and is helpful context
Surface & Context
Placing your pin on a realistic background dramatically improves how the mockup reads:
- Fabric (denim, canvas, felt) — most common for enamel pins; shows how the pin looks when worn
- Flat lay surfaces (wood grain, white marble, cork board) — great for social media and product listing images
- Dark backgrounds — help metallic finishes like gold or silver read clearly
- Backing card — including a branded backing card in the mockup gives a more complete, retail-ready impression
Size Reference
Include a size indicator in your mockup — either a measurement label, a ruler element, or a hand holding the pin for scale. Many buyers underestimate or overestimate pin size without a visual reference.
🎨 Have a design ready? Our team at CreatePins can review your mockup and provide a detailed production quote.
Submit Your Mockup for a Free QuoteStep 5: Use Smart Objects in Photoshop
If you’re working with Photoshop PSD mockup templates — which are available for free and paid download from sites like Freepik, Mockup World, and Graphic Burger — Smart Objects are the key feature that makes the workflow fast and non-destructive.
How to Use Smart Objects (Step-by-Step)
Open the PSD Template
Download a pin mockup PSD file and open it in Photoshop. You’ll see a layer panel with multiple layers — typically including a Smart Object layer labeled something like “Your Design Here” or “Place Artwork.”
Double-Click the Smart Object Layer
Double-clicking opens the Smart Object in a new temporary Photoshop document (a .psb file). This is where you place your artwork without affecting the lighting and shadow layers in the main mockup file.
Paste or Place Your Design
Paste your pin artwork into the Smart Object canvas. Scale and position it to fill the designated area. Make sure the artwork matches the shape/boundary of the Smart Object placeholder.
Save and Close the Smart Object
Press Ctrl+S (or Cmd+S on Mac) to save the Smart Object file, then close that window. Photoshop automatically updates the main mockup — your design now appears with all the lighting, shadows, and textures from the template applied.
Adjust and Refine
Back in the main PSD, you can modify background layers, adjust shadow intensity, change surface color, or add background props. Most PSD templates have multiple adjustment options built in.
Look for PSD mockup files specifically labeled “Smart Object pin mockup” or “enamel pin PSD template” — these are pre-rigged for pin shapes rather than general product mockups, saving significant setup time.
Step 6: Export for Different Uses
A single mockup file should be exported in multiple formats depending on how and where it will be used. Don’t rely on one file for everything — different platforms and purposes have different requirements.
Websites & Presentations
Transparent background support. Ideal for product pages, pitch decks, and overlaying on other designs.
Social Media
Smaller file size. Use for Instagram, TikTok, and Pinterest posts where transparent backgrounds aren’t needed.
Print & Manufacturing
High-resolution export for presentations, printed lookbooks, or sharing high-quality files with manufacturers.
Export Size Recommendations
- Social media — 1080×1080px (square) or 1080×1350px (portrait) at 72 DPI for web
- Product listings — minimum 2000px on the longest side for zoom functionality on e-commerce platforms
- Manufacturer submission — export at 300 DPI at actual printed/produced size
- Kickstarter / crowdfunding — 1200×675px (16:9 ratio) for campaign headers and update images
Step 7: Test and Gather Feedback Before Production
Your mockup is a communication tool, not just a design asset. Before sending your design to production, run it through a structured review process.
Design Checklist Before Final Production
- ✅ Are all lines a minimum of 0.4mm at finished pin size?
- ✅ Are all color zones fully enclosed with no gaps in the metal lines?
- ✅ Have gradients been removed from all enamel fill areas?
- ✅ Is the design readable at actual finished size (hold the mockup at arm’s length)?
- ✅ Does the text (if any) remain legible at scale?
- ✅ Are Pantone colors confirmed rather than assumed CMYK or RGB equivalents?
- ✅ Have you reviewed the design on both light and dark backgrounds?
- ✅ Have at least two other people reviewed the mockup for feedback?
Share your mockup in relevant communities like the r/pinfluencer or r/enamelpin subreddits before committing to a production run. These communities are experienced, honest, and generally very helpful to new pin makers.
Recommended Tools & Resources
Here’s a curated list of tools organized by purpose, from design creation to mockup generation:
Design Creation
Adobe Illustrator
Industry standard for vector pin design. Best for creating production-ready AI files with precise Pantone color management.
Inkscape
Powerful open-source vector editor. Full SVG support and capable of producing manufacturer-ready files.
Canva
Beginner-friendly design platform. Good for initial concept sketches and simple pin illustrations.
Procreate (iPad)
Excellent for hand-drawn pin illustration styles. Export to vector format using the included tools or third-party conversion.
Mockup Generation
Placeit by Envato
Large library of pin and badge mockup templates. Drag-and-drop interface with instant preview.
Smartmockups
Clean, fast online mockup tool with good product photography-style templates for pins and badges.
Adobe Photoshop
The gold standard for realistic mockup creation using Smart Object PSD templates. Required for production-quality results.
Mockup World
Free PSD mockup library with some pin and badge templates. Good starting point for Photoshop-based workflows.
Using Mockups for Marketing
Mockups aren’t just for pre-production review — they’re powerful marketing assets that can drive sales and build community even before a single pin is manufactured.
Pre-Sale & Crowdfunding
Platforms like Kickstarter and BackerKit have enabled countless independent pin makers to fund production runs through pre-orders. A compelling mockup is the central visual asset for any crowdfunding campaign — it communicates the product clearly, builds trust, and inspires backing decisions.
Social Media Content
- Instagram flat lay mockups — lifestyle-context mockups (pin on denim jacket, pin on cork board) outperform plain white background product shots in engagement
- TikTok design reveal videos — screen recordings of your mockup creation process can generate organic interest and community
- Pinterest — pin mockups on Pinterest boards are naturally discoverable and drive long-tail traffic to product listings
Product Listings
On platforms like Etsy, Shopify, or your own website, high-quality mockups in different contexts (worn, flat lay, close-up detail, scale reference) are essential for conversion. Research on product photography consistently shows that multiple contextual images significantly increase purchase confidence.
Building Pre-Launch Hype
- Share “sneak peek” mockups with partial reveals or blurred elements to generate curiosity
- Run polls asking your audience to choose between design options (A vs. B colorway)
- Post behind-the-scenes content showing your mockup evolving from rough sketch to polished preview
- Use countdown posts timed to your production drop date
Common Mistakes to Avoid
✅ Do This
- Use vector files for the base artwork
- Keep metal lines thick and clear
- Design at the actual finished size
- Use flat, solid Pantone-matched colors
- Include a size reference in the mockup
- Test readability at arm’s length
- Gather feedback before production
- Export in multiple formats for different uses
❌ Avoid This
- Using gradients in enamel fill areas
- Making metal lines too thin to produce
- Overcomplicating small or intricate designs
- Ignoring the metal plating color in your palette
- Skipping the mockup stage entirely
- Using raster files with low resolution
- Relying on screen color instead of Pantone
- Sending artwork to production without review
Ready to Turn Your Mockup into Real Pins?
At CreatePins, we always recommend preparing a mockup before production — it saves time, reduces errors, and ensures your final pins look exactly how you imagined. Our team can review your mockup and deliver high-quality enamel pins with precise detailing and professional finishes.
Get Your Free Custom Quote →Fast turnaround · Expert design review · All pin types available
Frequently Asked Questions
Here are answers to the most common questions from first-time pin makers about creating and using enamel pin mockups.
The best formats are vector files — AI, SVG, or EPS — for maximum scalability and precision. If using raster images, a high-resolution PNG with a transparent background at 300 DPI minimum is acceptable. Vector files are strongly preferred because they scale to any pin size without quality loss.
Yes. Online mockup generators like Placeit, Smartmockups, and Canva allow you to create presentable pin mockups without any professional software. While these offer less realism, they’re excellent for beginners who need a quick visual to share with manufacturers or use in marketing.
No — gradients are one of the most common beginner mistakes. Standard hard and soft enamel pins use solid, opaque colors separated by metal lines. Gradients cannot be reproduced in traditional enamel filling. If you want a gradient effect, you’ll need screen-printed or printed pins, which have different production requirements and costs.
Metal die lines should be no thinner than 0.4mm at the finished pin size. Thinner lines risk breaking during production or failing to hold the enamel fill. When designing at scale, always check how lines appear at the actual finished dimensions — what looks fine on a large artboard may be nearly impossible to manufacture at 1.5 inches.
A Smart Object is a special Photoshop layer that preserves your original design data and applies non-destructive transformations. In enamel pin PSD mockup files, Smart Objects let you paste your artwork and have it automatically conform to the lighting, shadows, and perspective of the template — making your design look like a real, photographed pin in seconds.
In a mockup, soft enamel appears textured — enamel color sits below the raised metal lines, creating a dimensional feel. Simulate this with inner shadow effects inside color areas. Hard enamel appears flat and polished — enamel is level with the metal, surface is mirror-smooth. Simulate with reflective highlights across the full pin face and no inner shadows.
Absolutely — a completed mockup is the best way to get an accurate production quote. It allows the CreatePins team to assess the number of colors, complexity of metal lines, size requirements, and finish type. Submit your mockup through the custom quote form for a fast, detailed quote.
References & Further Reading
- CreatePins — Top Rated Custom Enamel Pins Manufacturer
- Adobe — Adobe Illustrator: Industry Standard Vector Design Tool
- Inkscape Project — Inkscape Learning Resources — Free Vector Editor
- Mockup World — Free PSD Mockup Templates
- Pantone — Understanding Pantone Color Systems for Production
- Kickstarter Creator Resources — Crowdfunding Best Practices for Product Campaigns
- Graphic Burger — Free PSD Design Resources & Mockups
- CreatePins — Custom Enamel Pin Design Guide: How to Create Manufacturable & High-Quality Pins (2026)
- CreatePins — Enamel Pin Production Specifications: Line Thickness, Text, Colors & File Requirements
- CreatePins — Best File Formats for Custom Enamel Pins (AI vs PSD vs PNG)
- CreatePins — The Biggest Design Mistakes That Ruin Enamel Pins (And How to Avoid Them)
- CreatePins — Translucent Enamel Pin Design Guide
- CreatePins — How to Order Enamel Pins (Step-by-Step Guide)
- CreatePins — Custom Enamel Pin Production Expectations & Tolerances
- CreatePins — Glow in the Dark Enamel Pins: Complete Design Guide (2026)
- CreatePins — Pricing Custom Enamel Pins for Profit: Cost Breakdown, Calculator & Pricing Tips
- CreatePins — Custom Enamel Pin Production Timeline Explained
- CreatePins — Can You Get Custom Pins in 7 Days? (What’s Realistic)
- CreatePins — Custom Enamel Pin Hidden Costs You Should Know Before Ordering
- CreatePins — No Minimum Order Custom Pins: What You Need to Know Before You Buy
- CreatePins — 15 Enamel Pin Design Ideas That Always Sell (Proven & Creative)
- CreatePins — What Enamel Pin Manufacturers Don’t Tell You Before Ordering